Final Dungeon/BBEG HQ (Made in Dungeon Alchemist available on the Workshop)
Map creator
MinstoraDescription
Or- castle, mansion, lair, lab, whatever you wanna call it!
This is a dungeon I made for the end of my almost 2 yearlong running campaign in which the party shows up to the BBEG's HQ in order to put a stop to the ritual he was planning! I'll explain a bit about how the rooms are meant to be run so you can brainstorm and tweak em yourselves to fit your game!
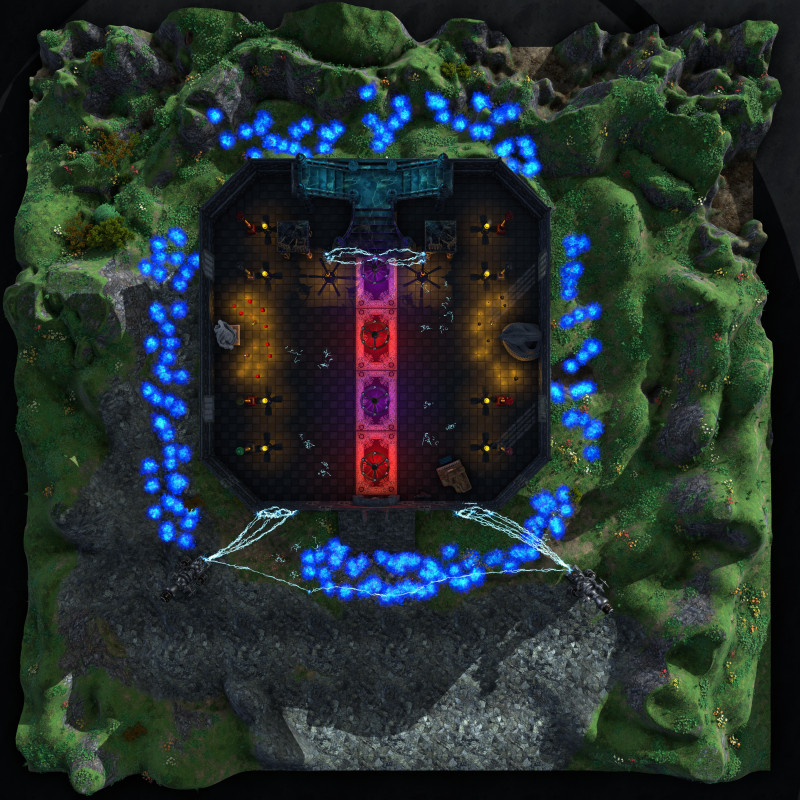
The Outside/Entrance
\- This is meant to be where the party is meant to confront the big bad verbally as he looks down on them from the balcony walkway. What I did is an Avengers style "on your left" moment where the NPCs most important to the party all showed up via portals to engage the big bag's forces on the outside while they storm the HQ, carving a path forward for them.
Main Hall/First Floor
\- This is where the party in my game had their first combat encounter. Forces the BBEG had left in wait just in case anyone made it inside.
Second Floor/Branching Paths
\- Here the party is presented with two doors that'll lead to separate parts of the castle, both via a tower with a spiral staircase. There's a lot of empty rooms on this floor but thats just to get the room of this floor to be one big unit. The halls can have whatever traps you wish.
Third Floor
\- So the branching paths will lead to either an Alchemist's Potion Workshop or a Wine Room in which the BBEG entertained guests. The wine room path would have an outside walkway. The way I ran this is that for either of the two outside walkways, whenever the party was walking them, the cannons that are affixed to the very top of the HQ would fire down on them. The wine room had an automaton butler who'd attempt to serve the party beverages, if they refused the butler would attack or the room would be booby trapped somehow as the butler was under strict orders to: "not allow anyone to refuse his masters hospitality". The alchemy room is where an Alchemist under employ from the BBEG can be found trying to make an escape. Their name is attached to several pieces of documentation in this room detailing their collaboration with the BBEG on a variety of alchemical experiments. The NPC here would provide a hint to the portal puzzle above or for the dungeon overall if they could assist them in destroying the last most well protected alchemical notes in the back of the room that're magically protected. Both of these paths lead to a comfortable study in which the BBEG and his lover spent much of their free time together. The way forward is blocked by a secret bookcase door that leads to another walkway. This walkway leads to a portal that will teleport the party to the next floor.
Fourth/Final Floor
\- This floor starts in the center room of 5, in which in my game I had the party attacked by several small size automatons that initially with illusion magic were pretending to be child servants. After that fight that party interacts with the automaton next to the portal in order to designate the portal on where to go out of 4 possible rooms. One of which is the master bedroom (with a portal that leads to the FINAL RITUAL SITE which is a pocket dimension that's encased in the barrier-ed orb above the HQ. This final room is titled "The Big Bad's Final Room (Ritual Site/Final Dungeon)" on the steam workshop. The other 3 are a mirror trap room which I ran in a way that each of the party members only sees themselves in the mirrors, but there's one in particular that shows themselves "how they don't want to see themselves with examples being alone, cowardly, or weak" the room starts off with one of the mirrors breaking as soon as they enter and shards of glass embed themselves into each of the party member's bodies somewhere. After a bit of time the shards deal a stacking 1d6 damage until they figure out the puzzle. In which the solution is to shatter the mirror that shows themselves in that particular way taking 2d6 psychic damage but getting sent back to the main portal nexus in the center. The other 2 rooms are necromancy lab that's set up for a combat encounter, and a separate lab that'll have potentially like important NPCs to be rescued suspended in the tanks of liquid but guarded by a clay golem and barrier they have to disarm somehow. After those encounters are beaten a portal is meant to appear taking them back to the portal nexus in the center.
Again thats just how I ran it all, but tweak it to your needs.
Final Room
Run this however you want, but this room is essentially for the big bad's final ritual or evil plan that takes place is a kind of pocket dimension.
The ritual is powered by the swirling multi-colored orb at the end of the room that's beaming up light. This orb is being powered by the 3 exterior rooms each sending up a different kind of energy to it. The electric room that I had powered by automaton corpses floating in the vats of the liquid, the fire room powered by the propulsion fire things, and the necrotic room powered by souls sacrificed to the well in the end of it which is destroyed once the 4 statues in that room are.
If the party destroys all of the facets of the ritual powering it, the ritual will cease and they win the day. I think it's best to put them on a timer though. The electric room had spare automatons guarding it, the necrotic room would spawn zombies/undead from the corpses of the sacrifices once someone entered it, and the fire room would damage anyone inside for a stacking 1d8 of damage per turn as they tried to figure out how to power down the fire device in the room.
This is while the big bad would be available in the circular room in the center fighting the party the entire time. Again, run it how ya like this is just how I did it. Have fun!
This is a dungeon I made for the end of my almost 2 yearlong running campaign in which the party shows up to the BBEG's HQ in order to put a stop to the ritual he was planning! I'll explain a bit about how the rooms are meant to be run so you can brainstorm and tweak em yourselves to fit your game!
The Outside/Entrance
\- This is meant to be where the party is meant to confront the big bad verbally as he looks down on them from the balcony walkway. What I did is an Avengers style "on your left" moment where the NPCs most important to the party all showed up via portals to engage the big bag's forces on the outside while they storm the HQ, carving a path forward for them.
Main Hall/First Floor
\- This is where the party in my game had their first combat encounter. Forces the BBEG had left in wait just in case anyone made it inside.
Second Floor/Branching Paths
\- Here the party is presented with two doors that'll lead to separate parts of the castle, both via a tower with a spiral staircase. There's a lot of empty rooms on this floor but thats just to get the room of this floor to be one big unit. The halls can have whatever traps you wish.
Third Floor
\- So the branching paths will lead to either an Alchemist's Potion Workshop or a Wine Room in which the BBEG entertained guests. The wine room path would have an outside walkway. The way I ran this is that for either of the two outside walkways, whenever the party was walking them, the cannons that are affixed to the very top of the HQ would fire down on them. The wine room had an automaton butler who'd attempt to serve the party beverages, if they refused the butler would attack or the room would be booby trapped somehow as the butler was under strict orders to: "not allow anyone to refuse his masters hospitality". The alchemy room is where an Alchemist under employ from the BBEG can be found trying to make an escape. Their name is attached to several pieces of documentation in this room detailing their collaboration with the BBEG on a variety of alchemical experiments. The NPC here would provide a hint to the portal puzzle above or for the dungeon overall if they could assist them in destroying the last most well protected alchemical notes in the back of the room that're magically protected. Both of these paths lead to a comfortable study in which the BBEG and his lover spent much of their free time together. The way forward is blocked by a secret bookcase door that leads to another walkway. This walkway leads to a portal that will teleport the party to the next floor.
Fourth/Final Floor
\- This floor starts in the center room of 5, in which in my game I had the party attacked by several small size automatons that initially with illusion magic were pretending to be child servants. After that fight that party interacts with the automaton next to the portal in order to designate the portal on where to go out of 4 possible rooms. One of which is the master bedroom (with a portal that leads to the FINAL RITUAL SITE which is a pocket dimension that's encased in the barrier-ed orb above the HQ. This final room is titled "The Big Bad's Final Room (Ritual Site/Final Dungeon)" on the steam workshop. The other 3 are a mirror trap room which I ran in a way that each of the party members only sees themselves in the mirrors, but there's one in particular that shows themselves "how they don't want to see themselves with examples being alone, cowardly, or weak" the room starts off with one of the mirrors breaking as soon as they enter and shards of glass embed themselves into each of the party member's bodies somewhere. After a bit of time the shards deal a stacking 1d6 damage until they figure out the puzzle. In which the solution is to shatter the mirror that shows themselves in that particular way taking 2d6 psychic damage but getting sent back to the main portal nexus in the center. The other 2 rooms are necromancy lab that's set up for a combat encounter, and a separate lab that'll have potentially like important NPCs to be rescued suspended in the tanks of liquid but guarded by a clay golem and barrier they have to disarm somehow. After those encounters are beaten a portal is meant to appear taking them back to the portal nexus in the center.
Again thats just how I ran it all, but tweak it to your needs.
Final Room
Run this however you want, but this room is essentially for the big bad's final ritual or evil plan that takes place is a kind of pocket dimension.
The ritual is powered by the swirling multi-colored orb at the end of the room that's beaming up light. This orb is being powered by the 3 exterior rooms each sending up a different kind of energy to it. The electric room that I had powered by automaton corpses floating in the vats of the liquid, the fire room powered by the propulsion fire things, and the necrotic room powered by souls sacrificed to the well in the end of it which is destroyed once the 4 statues in that room are.
If the party destroys all of the facets of the ritual powering it, the ritual will cease and they win the day. I think it's best to put them on a timer though. The electric room had spare automatons guarding it, the necrotic room would spawn zombies/undead from the corpses of the sacrifices once someone entered it, and the fire room would damage anyone inside for a stacking 1d8 of damage per turn as they tried to figure out how to power down the fire device in the room.
This is while the big bad would be available in the circular room in the center fighting the party the entire time. Again, run it how ya like this is just how I did it. Have fun!